
Why should scientists care about environments and testing things?
Environments and testing are critical for both teaching earth and environmental data science and doing science.
- If you are teaching data science to scientists: they address a critical (for lack of a better term) pain-in-the-buttox, which is students installing tools needed to process their data or create workflows .
- If you are a scientist or building data intensive workflows: if you want your work to be open and reproducible, so that others can use and build upon it (vs starting from scratch), you need a working environment that anyone can use (including your future self when that paper review comes back to you a 6 months later!).
When I was just starting out in science, the idea of testing being a part of my scientific and teaching toolbox was laughable.
Frankly, if you told me i’d be teaching data science 20 years later and running an organization devoted to the tools that support data science, I’d laugh even harder.
But today, testing and CI (Continuous Integration) I will talk about this in my next blog) has become an important part of any infrastructure that I create be it:
- documentation
- environments
- lessons (yes all of the online open lessons that I create are tested!!)
- or tools
I’ll devote another blog to how you setup testing using Continuous Integration - it’s actually easier than you think.
This blog is about how to setup a consistent and easier-to-install Python (conda) environment. Setting up consistent environments can help you create better, easier-to-reproduce workflows. This is particularly important if you are trying to help students setup their computers and create workflows in Python. But it will also support your scientific workflows!
And let me tell you this. Once you learn how to do this, it will become easier to setup, from the start, for all of your workflows!
I promise. Stick with me.
I realized that testing is valuable the hard way
Below I will explain how I learned that testing is important. But please know that even if your path is more linear than mine was, this is still for you. Setting up tests at the beginning will save you time in the long run.
My Path From Using Matlab to Teaching R & Python
When I was working at NEON building the NEON data skills program, the obvious choice for a programming language to learn and teach was R. I had used Matlab throughout my PhD program to process my data. But the ecology and biology community which NEON was focused on were heavily using R. And it was free and open source (FOSS) so I jumped ship from Matlab to R. I couldn’t afford a Matlab license at the time anyway so it made sense.
I quickly learned to love R. It was intuitive.
And once I got over the pirate symbols like <- and %>% I really
enjoyed using R and the RStudio interface is so intuitive!
R Came With Community
But what I loved most was the community. There was SO much support and infrastructure.
I could to do things like - create a new package to process a specific type of data.
I could write vignettes for packaging. I could easily create reproducible
reports with citations (RMarkdown).
Using R, I could run a workshop and send out setup instructions. People
installed the packages and came ready to learn. Just like that. Out of the
imaginary “box”. Sure GDAL was sometimes problematic in those year working with
R. But I figured it out.
(Does anyone actually put software in boxes anymore?)
Here Comes Python… and GDAL - Help!!
My move to the Python programming language was much less graceful. I switched languages because my program at CU Boulder was rooted in the Earth sciences.
Survey results (from surveys that I developed and sent out) told me that
the earth science
community was using Python more consistently than R.
Industry was using Python a lot too. It’s
generic design lends it to be used in many different fields and applications.
I knew that students could benefit professionally across many fields if they knew
how to code in Python.
By the way, I still think R is great for many things!
I still use R too! No judgement here!
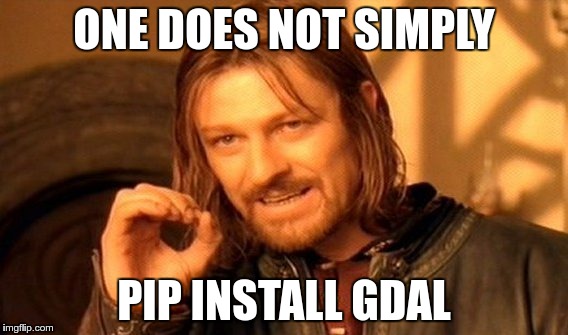
How Does One Install GDAL Anyway?
But, installing Python packages was much less intuitive. Quickly I had to figure
out whether to use pip or conda to manage installing package.
Once I
settled on conda, I was quickly faced with the question:
what channel do I use? conda-forge seemed like
a good one. But alas, I found myself with environment
conflicts.
Oh yes, conflict.
I’d install one thing and it would have a conflict with something else. Id remove that other thing and something else would break.
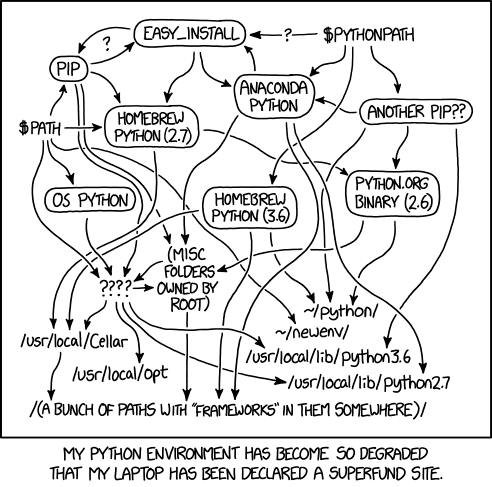
I found myself digging around for help and trying to interpret heavily technical Stack Overflow posts about how to install things correctly.
Why is this so hard?
Why do you hate me, GDAL? Whyyyyy?
I just wanted to teach people how to process data in a reproducible way
I just wanted to code. And to teach others how to code.
I didn’t want to students to spend weeks trying to get an environment working. That is how you lose people.
If I can’t install software, how can I code? – Says every student ever who deals with imposter syndrome
So what was my next step?
I (we) built the Earth Analytics Python Environment (& setup testing)
I knew that having an easier-to-install / almost fail proof Python environment would make teaching easier. And better yet, if I could test that environment on Linux, Mac and Windows then a lot of my issues would be solved. I would know before they installed the environment where the pain points were. I could troubleshoot before class rather than during class.
This was huge!
Students use all sorts of computers and OS’ - you can’t assume only one. You can assume that scientists using your workflow will similarly work on different types of computers with varying operating systems.
Enter the Earth Analytics Python Environment
Thanks to the help of several people including a great colleague Max Joseph. Max was really the person who early on introduced me to the concept of testing. At the time I didn’t fully understand just how important it was. But I got there quickly! Another person who I want to thank is Filipe Fernandes who really helped me better understand the complexity of resolving Python environments and avoiding channel mixing.
So this is what I built:
- A vetted Python environment: The original repo was in the
earthlaborganization. However, because it doesn’t appear to be maintained (I am not longer there), I made a fork that I can maintain. This environment has all of the Python tools needed to complete my earth-analytics-python class which was heavily spatial and remote sensing focused but also included a sine natural language processing, API data access and other critical skills. The environment can be installed quickly and easily using a recipe file (also known as an environment file). I’ll walk you through that, below. - The environment has a GitHub Actions workflow that tested it on Windows, Mac and Linux.. I’ll talk about that part more in a second, followup blog.
The original workflow was built using the CI platforms: Travis CI and Appveyor. I prefer GitHub actions these days
Thanks to Filipe’s help, in a separate environment that I created for an automated build, we used Conda Lock. We did this so we could pin down exactly what versions of all tools and dependencies were being installed once we have a working environment. Boy this made troubleshooting easier! More on that in another blog.
What do all of the pieces in this earth-analytics-python repository do?
Stick with me here. Next, I will break down the structure and files in this earth-analytics-python GitHub repo:
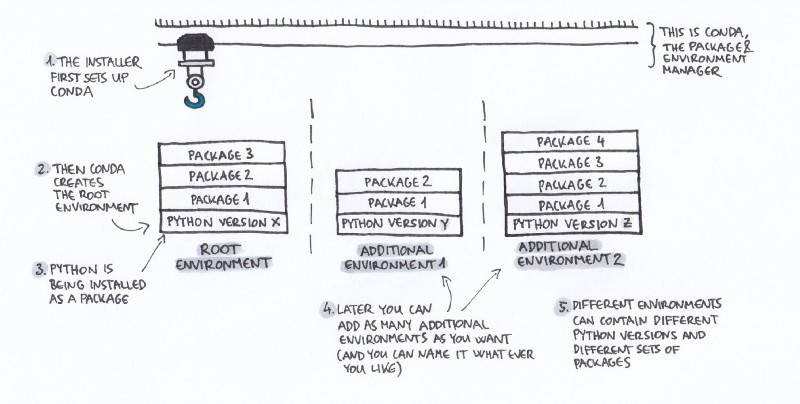
First you have the conda Python environment file. What’s that?
You can think of a Python environment file as a recipe for
what to install and where. This environment file,
allows you to specify:
- What packages you want in your environment
- How you want to install them (e.g. using pip or conda - more on package managers below).
About package managers
pip and conda are two different package managers. A package manager installs:
- the packages you want to use AND
- the dependencies of that package on your computer.
It also will decide the best version of the dependencies to install that will reduce conflicts across your entire environment (image installing 10 packages each that have 3 dependencies). It is doing a lot of work for you.
Every package is going to rely on other packages to run. Each of those packages that it relies on is called a dependency.
The package manager installs everything that you need so you don’t need to think about it. A package manager also allows you to decide what channel you want to install the tools from.
More on channels below.
Let’s check out the environment.yml file
Below you can see a snippet of
what the earth-analytics-python environment looks like. The file is always
called environment.yml by default.
name: earth-analytics-python
channels:
  - conda-forge
  - defaults

dependencies:
  - python=3.9
  - pip
  # Core scientific python
  - numpy

  # Plotting
  - matplotlib
  - plotly
  - seaborn
The file is in YAML format. You can think of
the .yaml as a
list of things. This list can have a hierarchy too. In this case, this
list of things is for a recipe to build a Python environment
using the conda package manager.
Here’s a lesson that I wrote and used to use to teach my students about Python Environments.
Notice a few things:
The file has an environment name:
name: earth-analytics-python
channels:
  - conda-forge
  - defaults
At the top of the file, you can see the environment name: earth-analytics-python: As you might guess this specifies the name of the environment.
The name allows you to activate it.
What is activating an environment?
Activating refers to the process of telling your computer to use that environment to run your Python code.
So running:
$ conda activate earth-analytics-python
will ensure that when you open a Jupyter Notebook or open the Python prompt in bash, it will use that environment with all of the tools loaded.
Yup, this means that you can have multiple environments on your computer if you wish. { : .notice }
The environment.yml file specifies channels
channels:
  - conda-forge
  - defaults
Next notice the channels: element in your file. Channels tell the installer where to get
the installation files from.
You can think of a channel as a big box of tools. A toolbox! In Python,
and specifically when you are using the conda package manager, there
are multiple toolboxes containing tools (Python packages) that you
can install things from.
Here’s the confusing part:
- These toolboxes can contain the same tools. But don’t always contain the same tools.
For instance conda
has a default channel that it uses to install packages. So if you install the
Anaconda distribution it will likely use the default toolbox.
I advise that you do NOT INSTALL ANACONDA. While it’s a great distribution it has a lot of things that you don’t use. And it can set you up for conflicts later down the road if you need to install other things.
The conda-forge channel is separate and tends to be great if
you are using a lot of spatial packages. It is my preferred channel.
You can install matplotlib from:
- conda defaults:
$ conda install matplotlib - conda conda-forge
$conda install -c conda-forge. (-cfor channel)
OR
- using the pip package manager
pip install matplotlib
Mixing channels is dangerous!
The problem here is that each tool within each channel and within each package manager can be slightly different in terms of how dependencies are resolved. This can cause conflicts in your environment.
matplotlibinstalled using the pip package manager is likely optimized to run with other tools installed usingpip.- Similarly
matplotlibinstalled usingconda conda-forgeis optimized for tools on the conda-forge channel of conda.
When installing tools you can get yourself into trouble if you mix channels or
package managers. So WHEN you can avoid installing tools using both pip and conda
package managers. Pick one package manager (and channel) for most tools (sometimes a package may not be on
conda). Similarly if you are using conda, stick with a channel. Use defaults
or conda-forge. But try as hard as you can to avoid using both. This is often why people’s Python environments “break”.
Sometimes you will have to mix channels a little bit. Don’t worry, it happens and it is OK!
Conda-forge and defaults channels in your environment.yml file
In this file there are two channels:
- The first is
conda-forge. - The second is
defaults.
When you install this environment, this environment.yml recipe file tells the installer
to use the conda-forge channel first. If for some reason it can’t find a tool
in the conda-forge channel, it will move on to look in the default channel.
This approach works well as generally all of the tools will be installed using
conda-forge creating a happy environment that you will be able to use
consistently.
Dependencies in the conda environment.yml file
Moving lower in the environment.yml file, you can see the “dependencies” list.
dependencies:
  - python=3.9
  - pip
  # Core scientific python
  - numpy

  # Plotting
  - matplotlib
  - plotly
  - seaborn
At the top of this list is the version of Python that you want your environment to run!
Below is a list of packages (and version if you want to be specific) that you want to install in that environment.
Remember that every package has a bunch of dependencies or other packages that it relies
on to run properly. So when you install matplotlib for example. It’s going to
install other things that matplotlib needs.
The conda installer will find the best mix of package versions and dependencies
to install. This ensures (most of the time) that your environment works.
About pinning package versions
Note that in this environment, the environment is pinned to Python version
Python=3.9. But all of the other dependencies do NOT specify a version. What this means is that the environment will intall python 3.9 but in all other cases it will install the most recent version of the package if it can OR resolve to install the package version that works best in your specific environment.
Let’s take a moment to talk about pinning.
Pinning can be dangerous
Generally for teaching and daily use, pinning is a bad idea. Why? Because if you want the environment to resolve properly, one pinned package can potentially cause a lot of points of failure elsewhere.
This is in part because remember that each package has dependencies. and you don’t know if those dependencies are pinned too.
If none of this makes sense to you, there is one take away:
- Don’t pin packages
Let the package manager do the work for you to resolve the best versions of each package to work. This gives you the best recipe for success.
Pinning can be ok sometimes especially for reproducible workflows
If you are a scientist that is creating a reproducible workflow that you want someone (or your future self) to use in the future, it might make sense to pin versions. but in that case, you probably want to create a full environment file that is working on your computer that has EVERYTHING pinned.
Yes everything.
Including dependencies.
More in this in the conda docs - this is it’s own topic!. And if you want to do this, it might be best to create a containerized (Docker) environment that will run on any machine regardless of Operating System.
How to install a conda environment
The best resource for working with conda environments is the conda documentation on managing environments.
To get started with installing it, you’ll want to cd to the directory where your environment lives and type:
conda env create -f environment.yml
To see the environments available for you to use on your computer, you’d use.
conda env list
Again the conda documentation does a pretty nice job of walking you through all of this!
Wrapping things up and next steps
So now you have a basic understanding of why environments are so important.
They are important for both teaching Python and for doing data
intensive science in a way that is open and reproducible.
Having an environment.yml file available for your students or for
your project colleagues / collaborators will in the long term save your
time.
Testing it will make it even better.
Now it’s time for testing
The next step towards making your environment easy to install for all users is testing. And lucky for you, you can setup testing on GitHub using GitHub actions.
You will want to setup testing if you are creating an environment that:
- you want to evolve over time (i.e. you want to update package versions over time). And
- you want others to be able to use (those other people may use different OS’ than you!)
At a minimum you will want to test that the environment can install on: on Windows, Mac and Linux. These are the common operating systems that most people use.
In the next blog post I will discuss setting up testing in more detail.
Comments?
Share on
X Facebook LinkedIn BlueskyOther articles that you might enjoy...
How to setup testing for a Python conda environment using GitHub Actions (and why testing matters)
In this post I will discuss how to setup a build using GitHub actions that was created to test the earth-analytics-python conda environment on different operating systems. Testing supports building open science workflows as it ensures that the environment will run on Windows, Mac and Linux.
Why tested Python environments matter for science
Teaching earth and environmental data science can be time consuming. Learn about what I learned when I tried to create an consistent Python environment that was easy for students to install. (and how this could help your science as well.